
Deploy your first agent
Go from a new account to a working AI agent. Choose a plan, pick a template, set up an environment, name the agent, answer its setup questions and chat.
On this page
- Before you start
- Step 1: Choose a plan
- Step 2: Pick what the agent does
- Step 3: Set up an environment (first agent only)
- Step 4: Name the agent and create it
- Step 5: Answer a few questions while it sets up
- Step 6: Finish setting up
- Step 7: Send your first message
- If something stops you
- Frequently asked questions
This tutorial takes you from a brand-new account to an agent that is working and answering you. It takes a few minutes of clicking, then a short wait while Qoren sets the agent up. You can answer the agent's setup questions during that wait.
Before you start#
- A Qoren account. If you do not have one yet, create an account first.
That is all. You do not need a server, an API key for the AI model, or anything installed on your computer.
Step 1: Choose a plan#
Agents run on a plan, so the first time you create one, Qoren asks you to pick a plan.
- In the sidebar, click New agent.
- If you have no plan yet, the page shows Choose a plan first. Click Choose a plan.
- Pick a plan and click Start Free Trial for a 7-day trial, or Subscribe now to start paying straight away. The trial needs a card and turns into the plan you picked after 7 days, unless you cancel before then.
- Finish the payment on the checkout page. You come back to Qoren's billing settings.
What each plan includes is in Plans and the free trial and on the pricing page. You do not need your own AI model key: agents use Qoren's key and the model's work is paid from your credits. During the trial, add credits first to use Qoren's key, or bring your own key.
Step 2: Pick what the agent does#
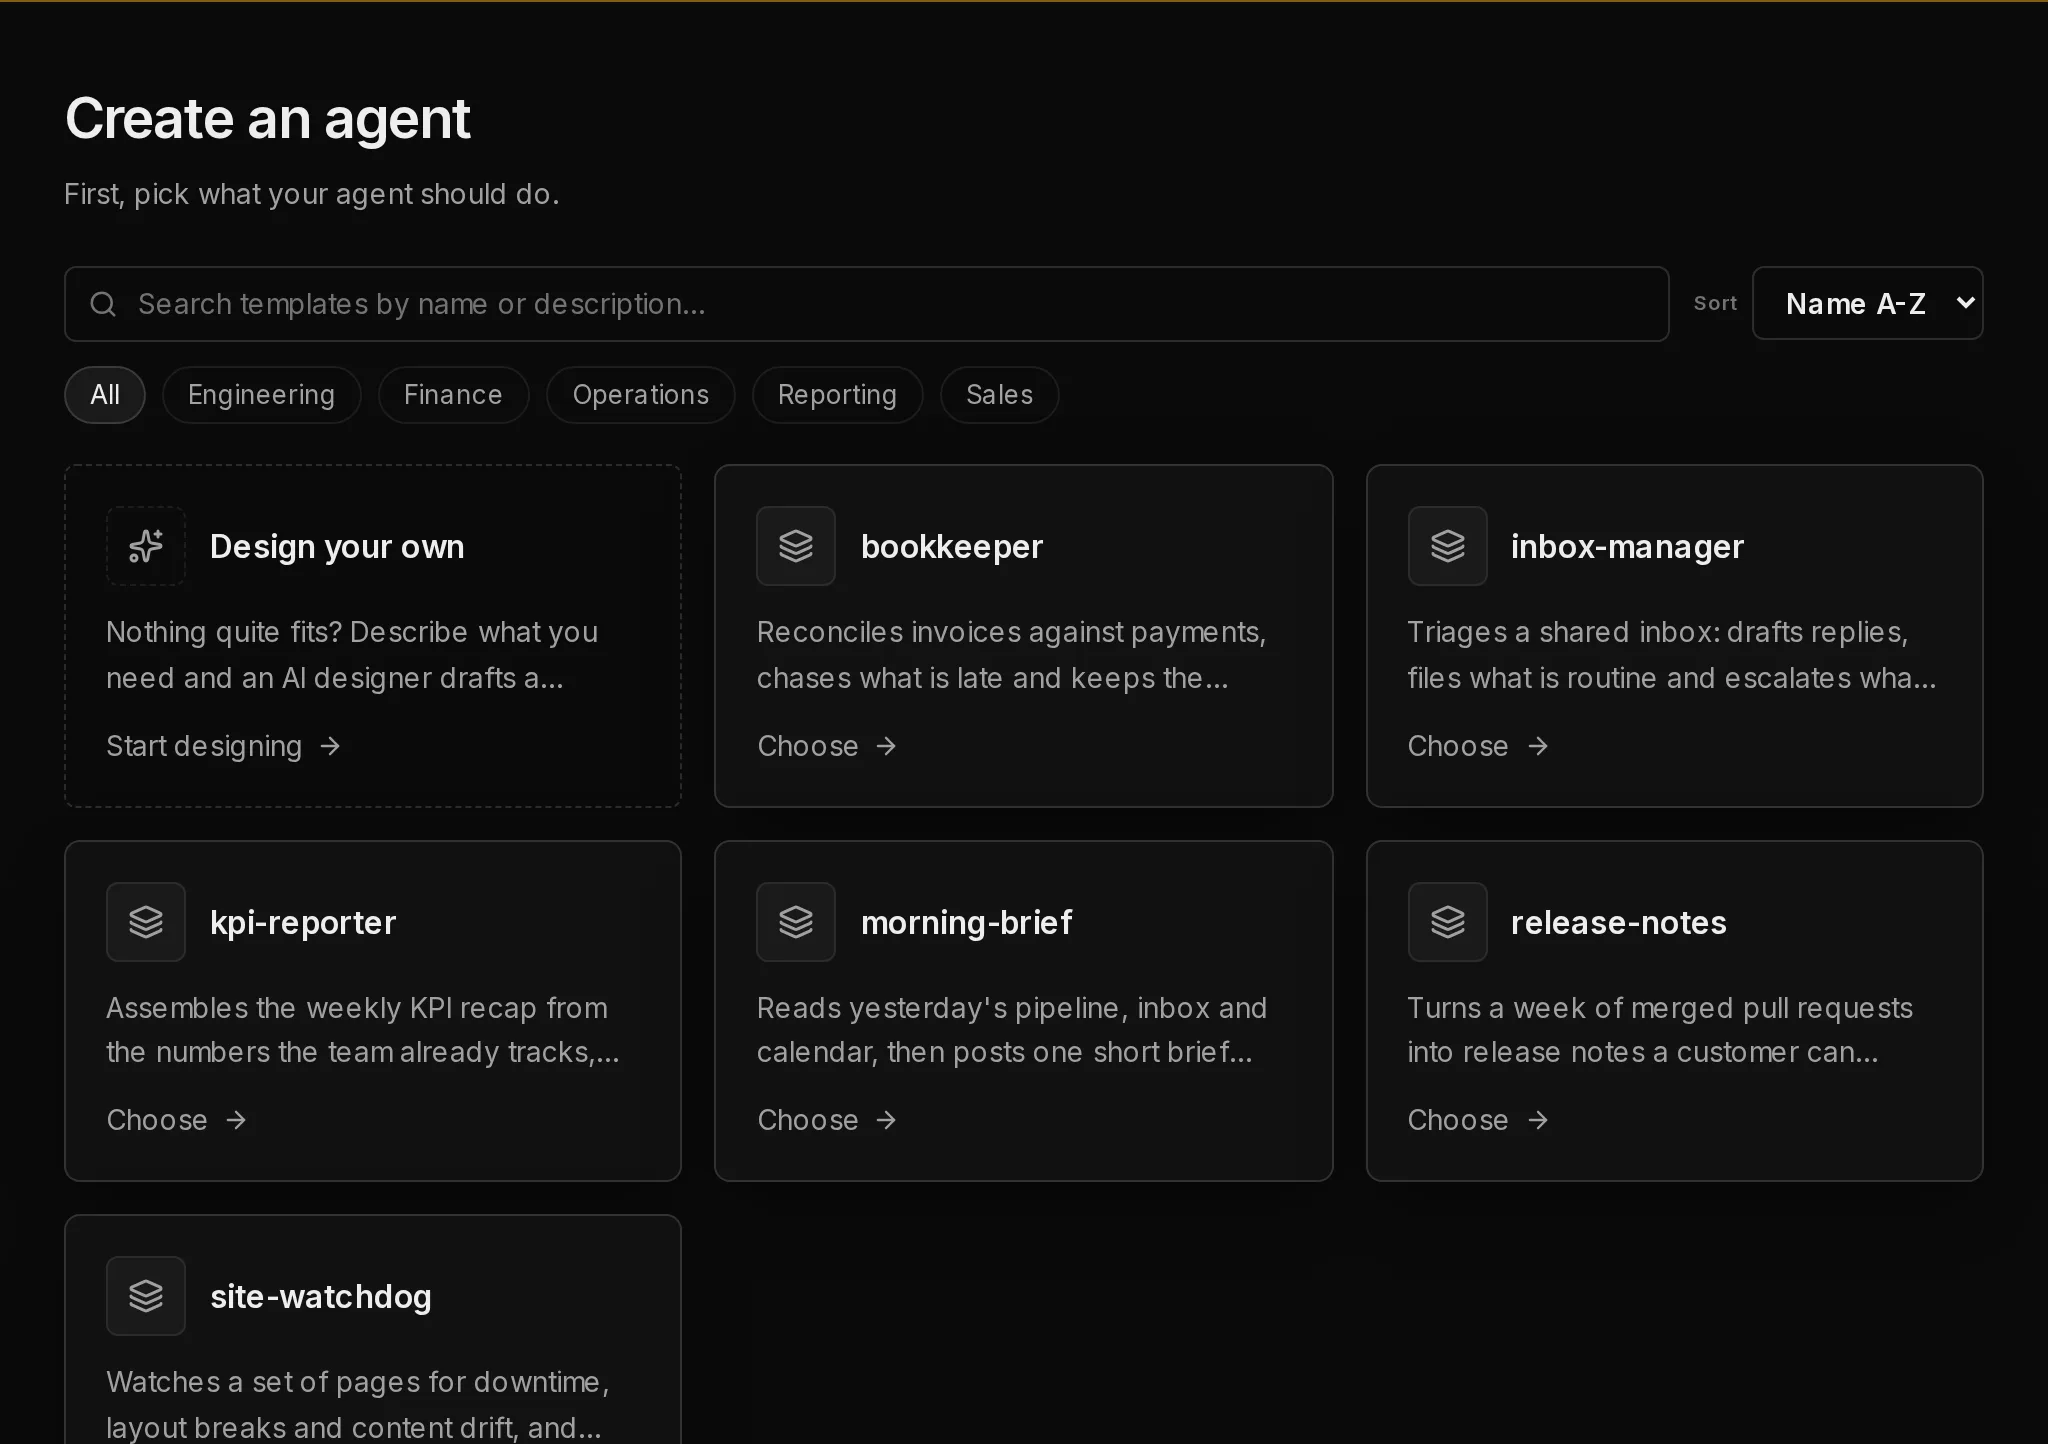
- In the sidebar, click New agent again. The Create an agent page asks you to pick what your agent should do.
- Browse the templates, or type in the search box (1) to find one by name or description. The category buttons under it narrow the list.
- Click the template you want (2). Each card says in one line what that agent does.
 123
123Nothing quite fits? Click Design your own (3) and describe the job in your own words. An AI designer drafts a template with you, then brings you back to this flow. See Design an agent with AI.
Step 3: Set up an environment (first agent only)#
Your agent needs an environment to live on: a private computer in the cloud that Qoren runs for you. If you already have one, Qoren picks it for you and you can skip to step 4.
If this is your first agent, the page says Set up an environment first.
- Click Set up an environment.
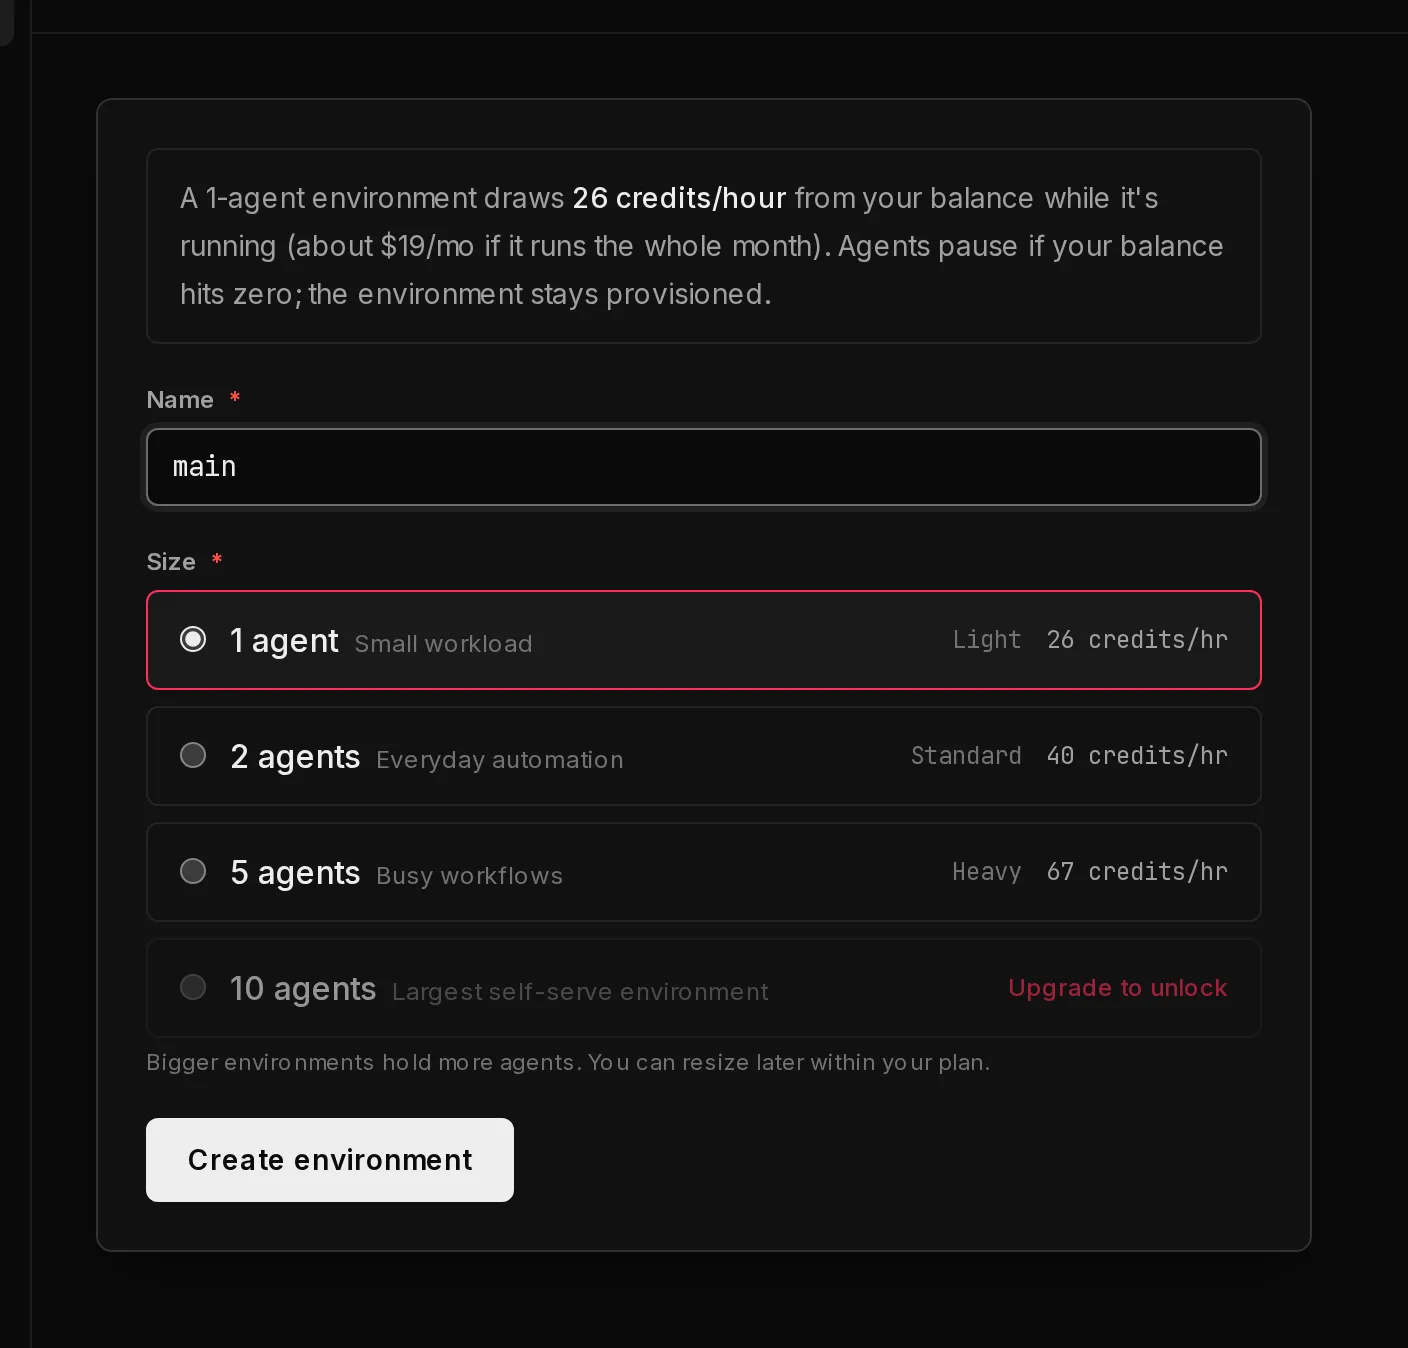
- Give the environment a name (1), such as
main. Spaces turn into dashes as you type. - Choose a size (2). Sizes are named by how many agents the environment holds. The box at the top shows how many credits the chosen size draws per hour while it runs. Sizes your plan does not include are greyed out with Upgrade to unlock.
- Click Create environment (3).
 123
123Qoren sends you straight back to your agent while the environment is created. The form shows Your environment is being set up, which usually takes a minute or two, and the create button reads Waiting for your environment… until it is ready. Carry on with the next step in the meantime. For more on sizes, see Environment sizes.
If you run agents for clients and have Clients turned on, the form first asks Which client is this for? The agent then goes on one of that client's environments. See Clients.
Step 4: Name the agent and create it#
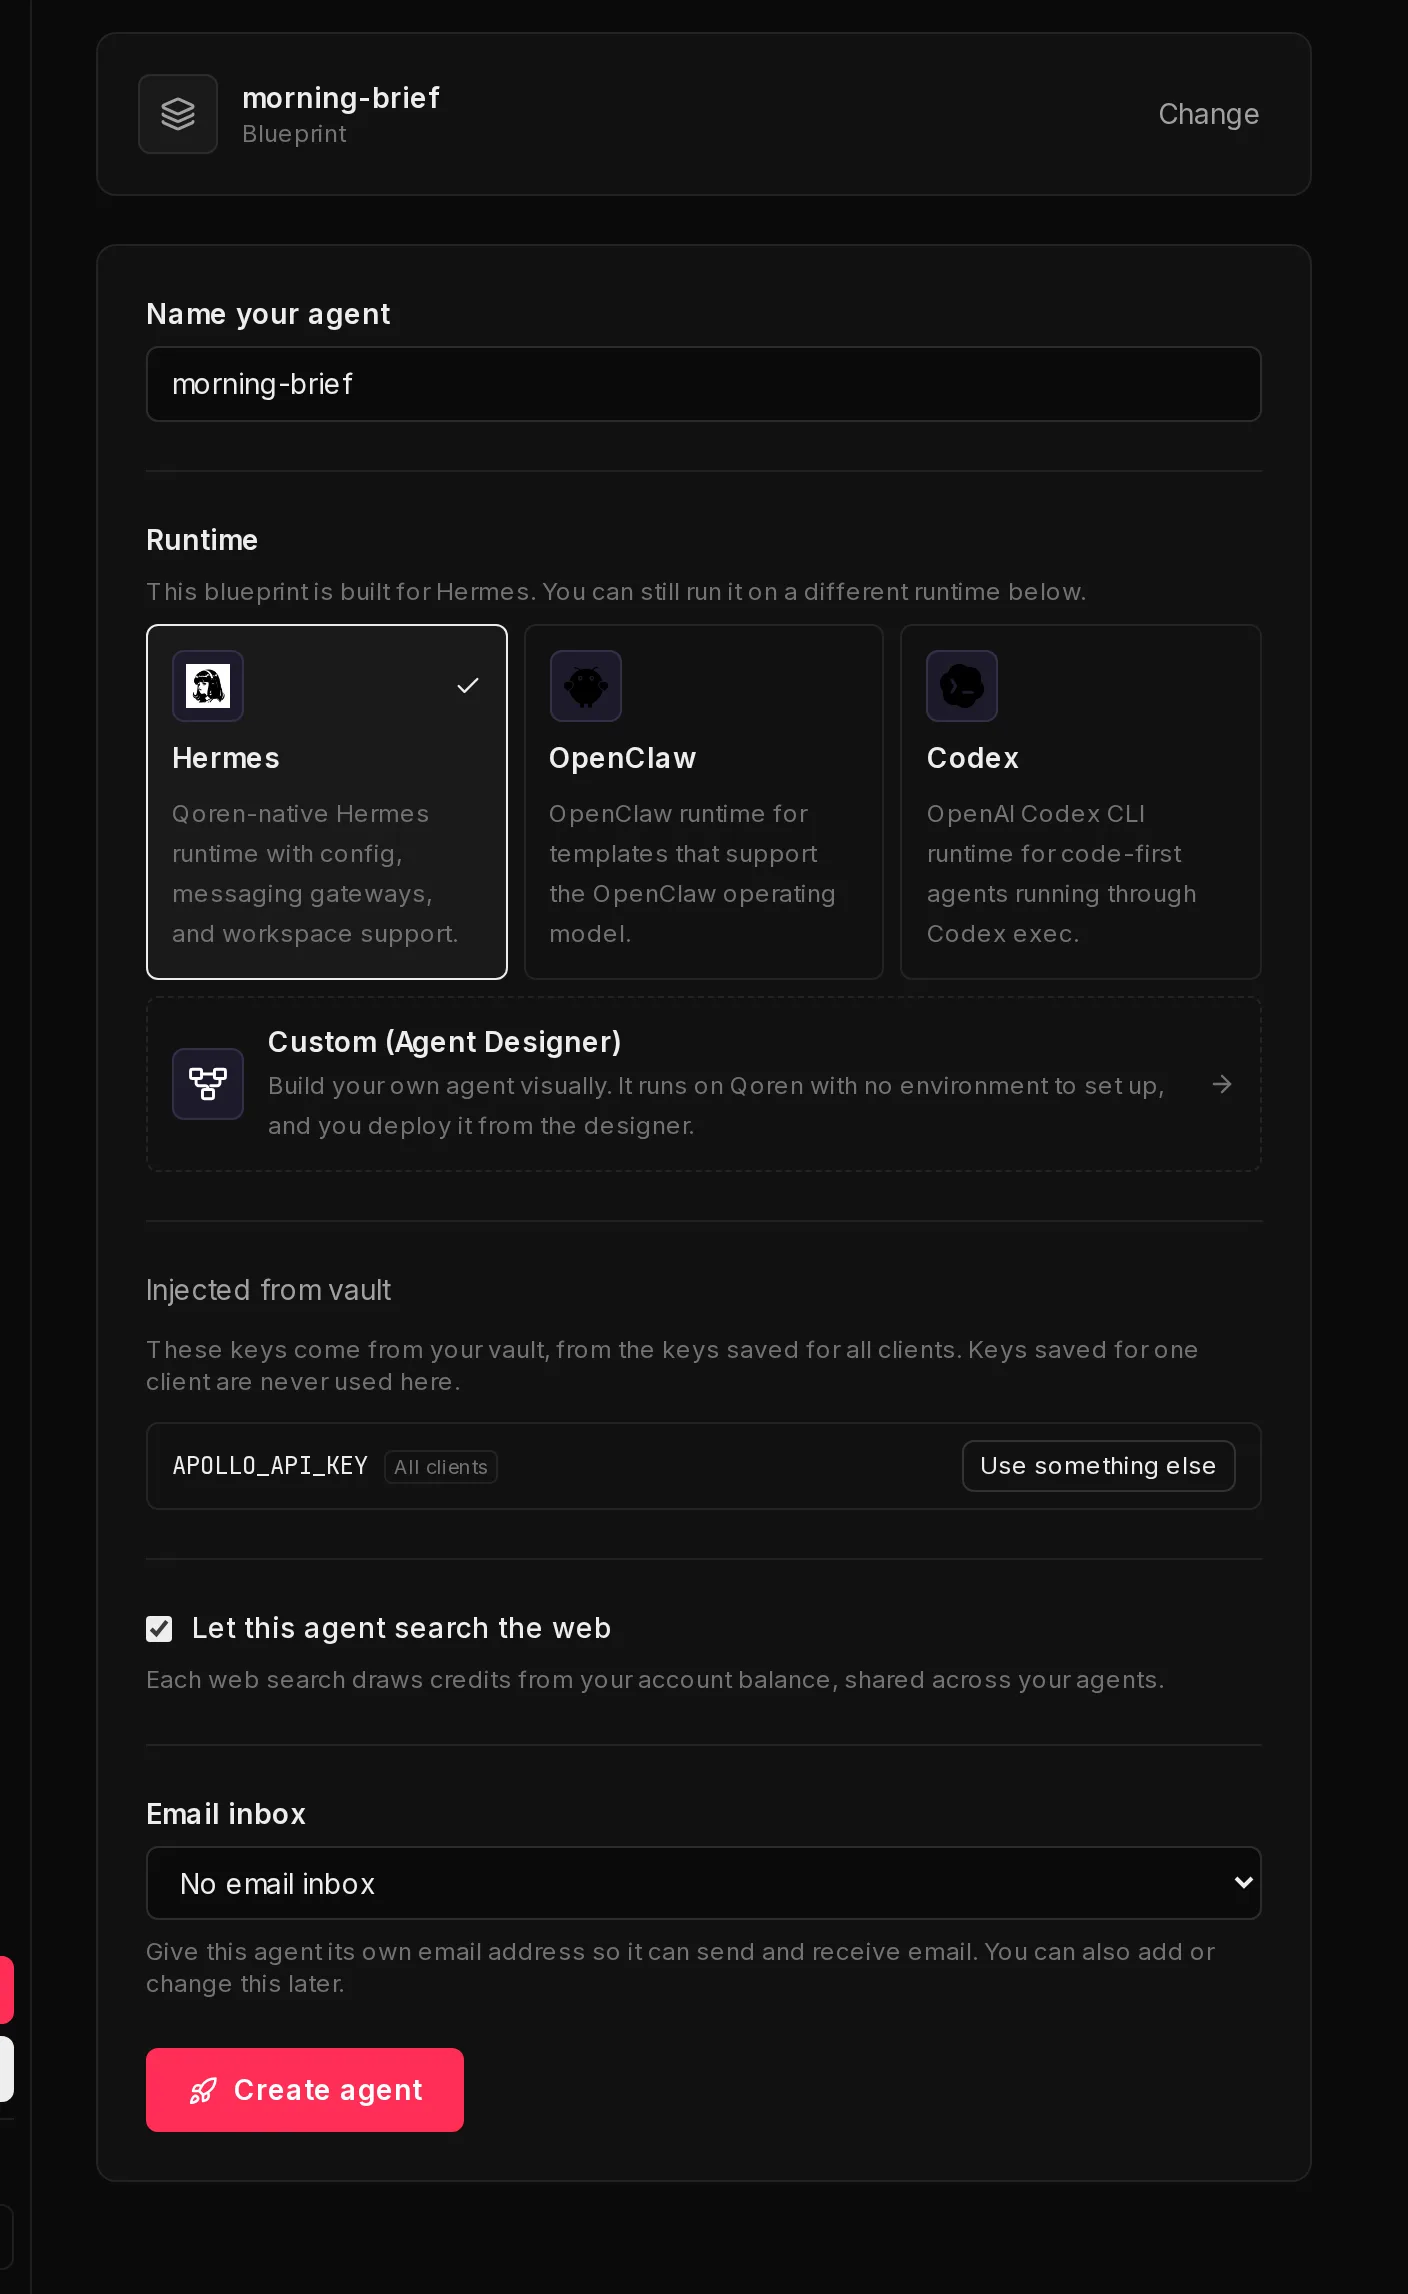
- Under Name your agent (1), keep the template's name or type your own.
- Under Runtime (2), leave the runtime the template picked. It is the agent software underneath, and the template's own choice is the safe one. You can pick another; see Runtimes for what changes.
- If the template needs keys, the form says This blueprint needs a few details to get started: and lists them. Type each value, or, if you saved the key before, choose Use name from your vault in the list above the box. See Keys and passwords.
- Leave Let this agent search the web (3) ticked if the agent should look things up. Each web search draws credits from your balance.
- If your plan includes email inboxes, choose under Email inbox (4) whether this agent gets an address of its own. No email inbox is fine for now; you can add one later. See Give an agent an email address.
- Click Create agent (5).
 12345
12345The agent starts on your default AI model. You can switch models any time after it is set up.
Step 5: Answer a few questions while it sets up#
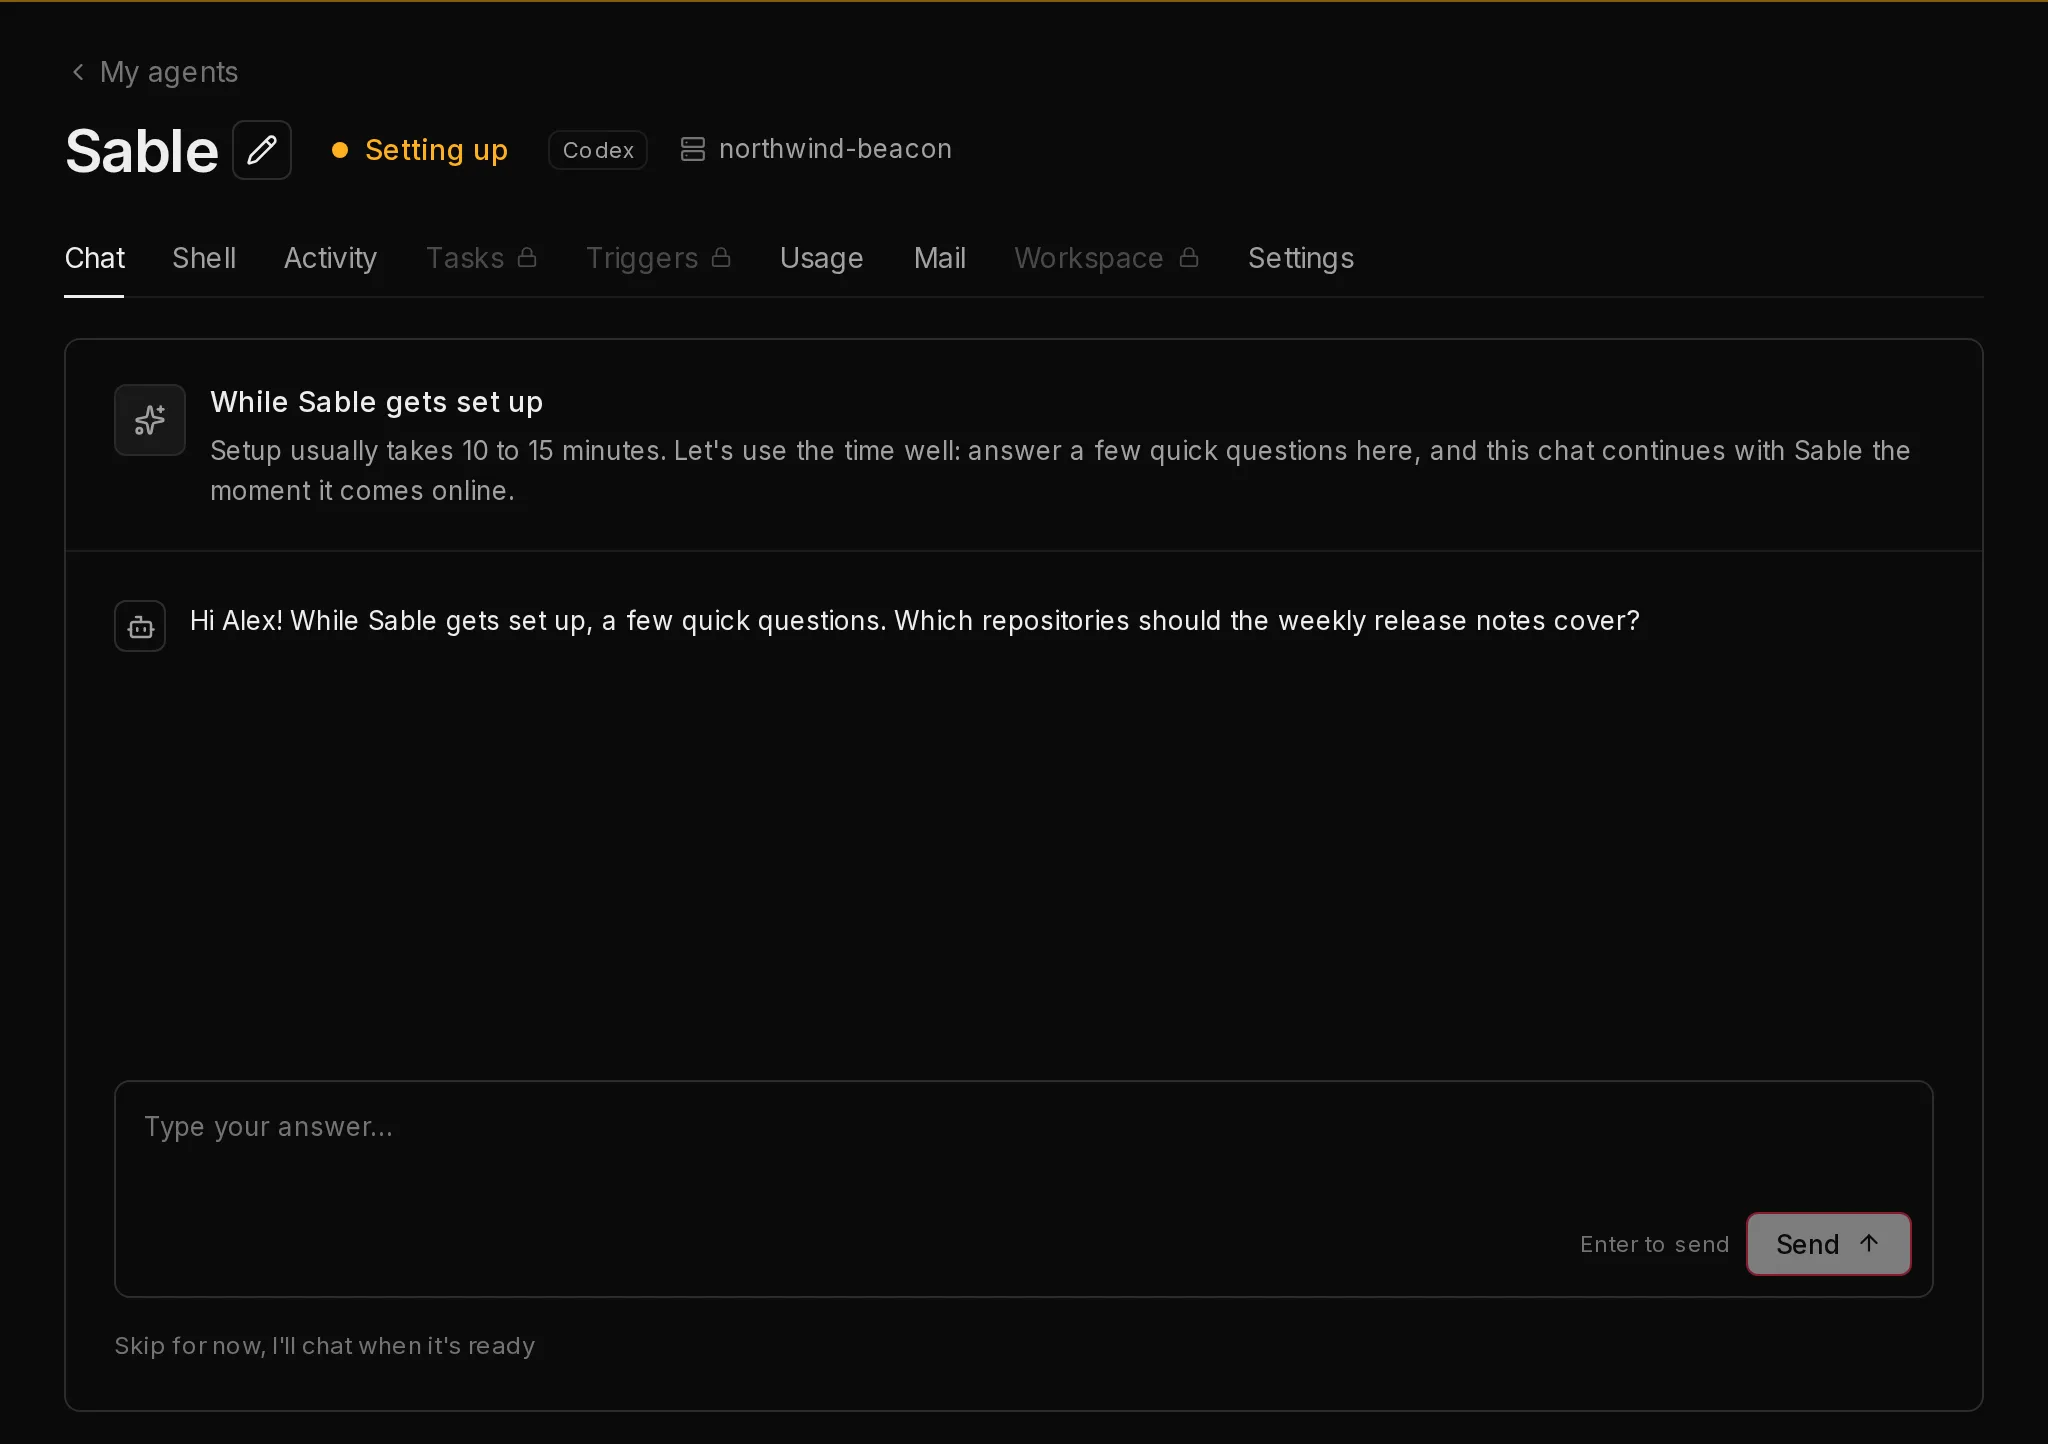
Qoren opens your new agent's page on the Chat tab. The status next to its name reads Setting up (1), with the step it is on next to it. Setup usually takes 10 to 15 minutes.
Instead of a silent wait, a setup assistant asks you a few quick questions about the job (2). It already knows your business details, so it does not ask who you are. Type your answer and press Enter. Your answers are saved as you go, so you can close the page and come back.
 123
123Rather not answer now? Click Skip for now, I'll chat when it's ready (3). You can change your mind with Answer a few setup questions while you wait.
When the agent comes online, the chat carries on with the agent itself. It already has your answers, and it writes you its first message. A copy of your answers is also saved in its workspace as SETUP-INTERVIEW.md.
While setup runs, the Tasks, Triggers and Workspace tabs and some sections of Settings are locked. They open as soon as setup finishes. If setup seems stuck, see Setup is taking a long time.
Step 6: Finish setting up#
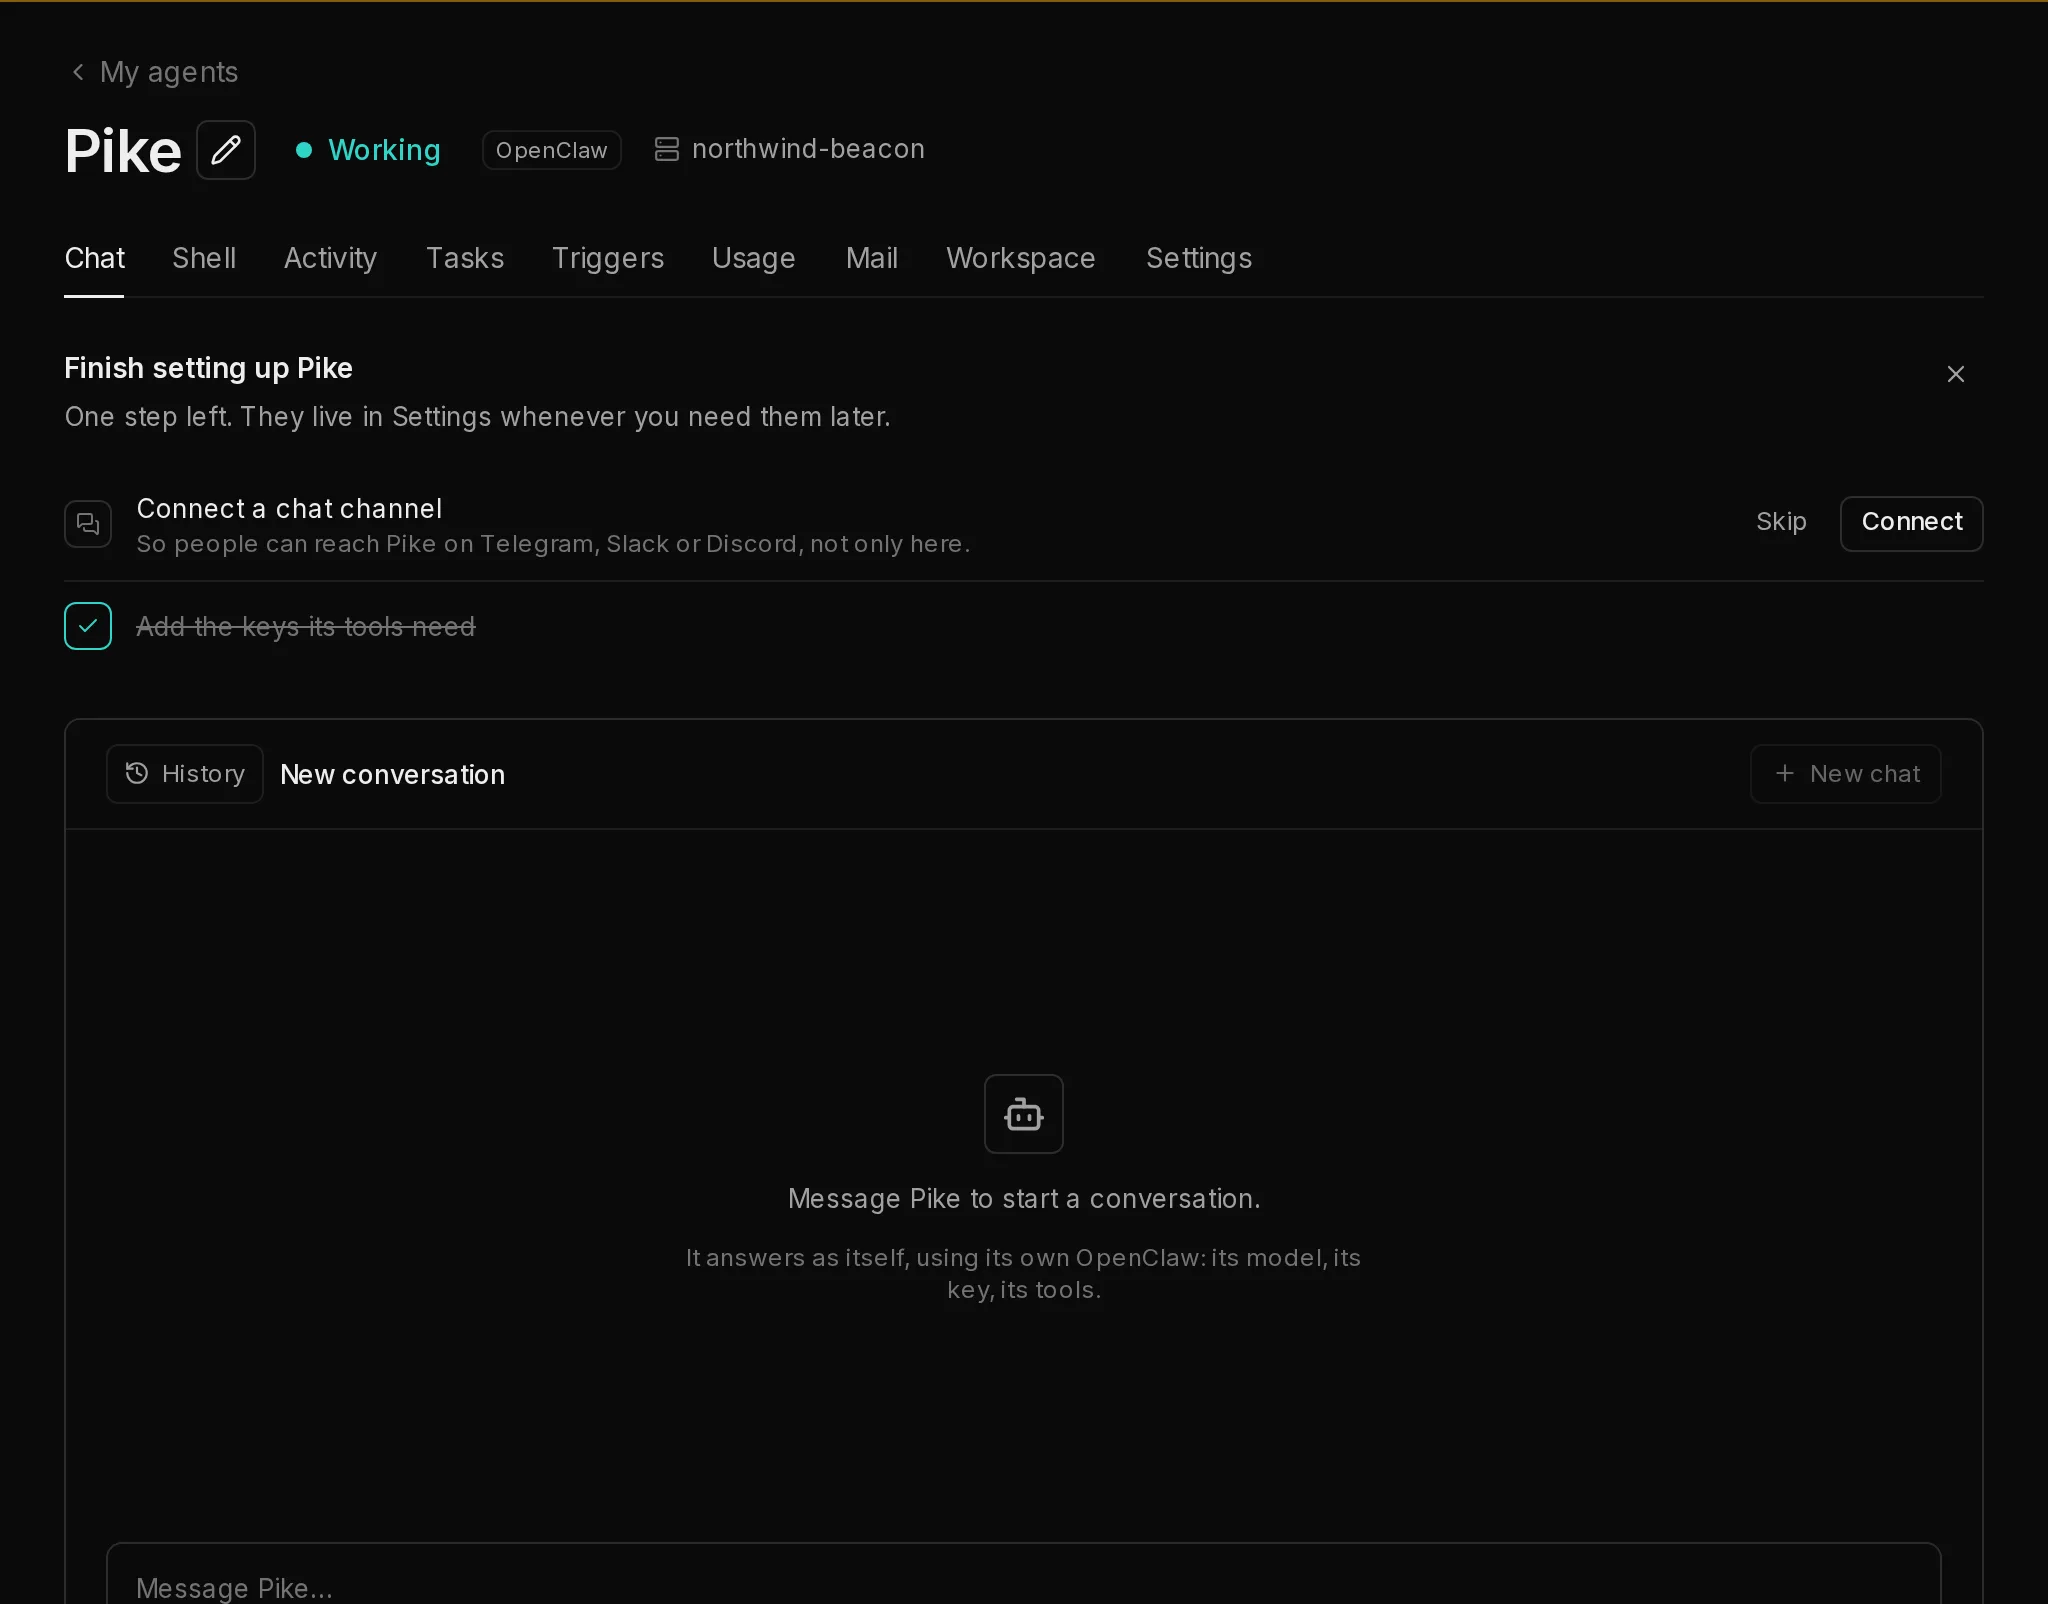
When the status reads Working, a Finish setting up checklist (1) sits above the chat with up to two steps:
- Connect a chat channel, so people can reach the agent on Telegram, Slack or Discord, not only in Qoren. Click Connect.
- Add the keys its tools need, if its tools call services that need an API key. Click Add keys.
 12
12Neither step is required. Click Skip on a step the agent does not need, or close the checklist. Both live in the agent's Settings whenever you want them. See Finish setting up an agent.
Step 7: Send your first message#
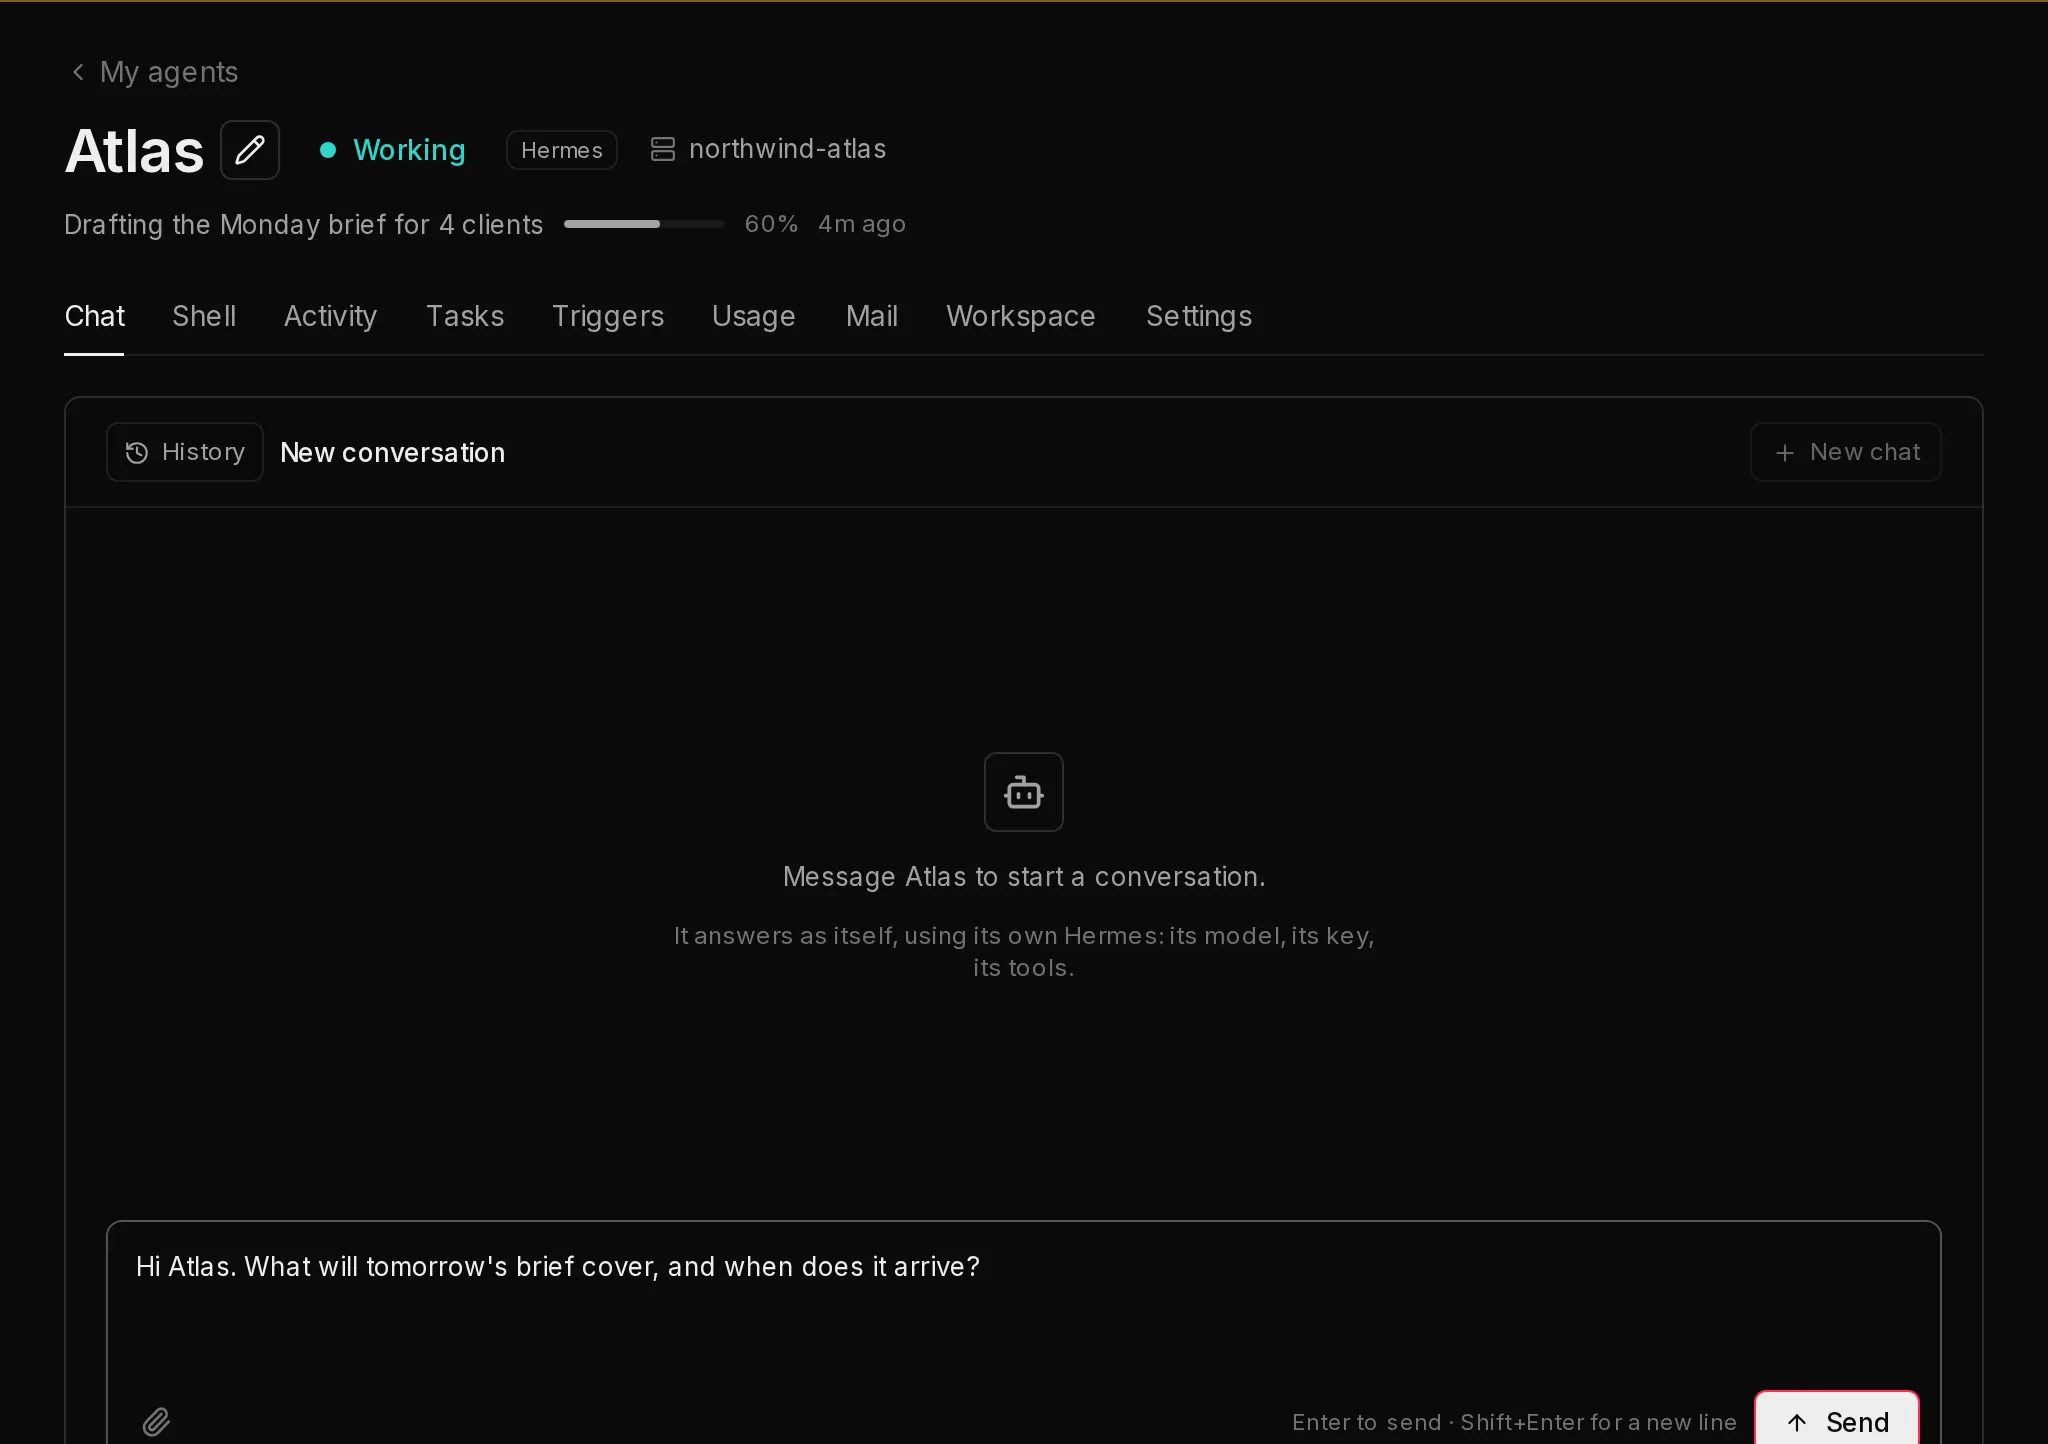
- Click the message box (2) and type what you want. Ask it what it will do for you, or give it its first task.
- Press Enter or click Send (3). Shift+Enter starts a new line.
 1234
1234Replies can take a while, because the agent does the work before it answers. Conversations are saved to your account: open earlier ones from History (4), or start a fresh one with New chat. More in Chat with an agent.
That is it: your first agent is live. From here, give it a schedule, connect a chat app, or watch what it does on its Activity tab.
If something stops you#
- Choose a plan first. You have no active plan. Pick one as in step 1.
- This blueprint needs a bigger environment. The template needs an environment that holds more agents than yours. Click Manage environments to resize one or add a bigger one, then come back.
- This environment is full. Every size holds a set number of agents. Resize the environment or add another one.
- An error says an agent with that name already exists. Two agents on one environment cannot share a name. Pick another name.
- Please fill in followed by a key name. The template needs that key. Type it, or pick it from the Vault.
- A red note under Runtime says the runtime can't run scheduled tasks. The template has scheduled tasks and the runtime you picked cannot run them. Pick another runtime.
- Out of credits. A strip under the top bar says your agents are paused. Top up your credits and try again.
Frequently asked questions#
How long does it take to deploy an agent?
The clicking takes a few minutes. After you click Create agent, setup usually takes 10 to 15 minutes. A brand-new environment adds a minute or two before that.
Can I run more than one agent on one environment?
Yes. An environment holds as many agents as its size says, and each agent runs separately from the others. Create the next agent the same way, and Qoren puts it on an environment you already have.
Can I change the model or the name later?
Yes. Rename an agent with the pencil next to its name, and change its model from the AI model row in its Settings. See Choose a model.
Do I need my own AI model key?
No. Agents use Qoren's model key, and the model's work is paid from your credits. During the free trial, add credits first or connect your own key. See Bring your own key.